

Choosing an internal or external door
Wickes' doors can basically be divided into two categories - panel and flush. Panel or carved doors consist of a strong timber framework enclosing a number of inset panels which are either already in-filled with matching timber or which are intended to be in-filled with glass.
Flush doors have a lighter timber framework which is completely covered on both sides by a sheet material such as hardboard or plywood. Wickes external carved panel doors are made of top quality hardwood pre-treated with Basecoat. The door sizes are standard. Some have a finished thickness of 40mm, the majority are 44mm (13/4").
You should check in the Wickes booklet or in your local store for available external door styles and sizes. Some doors have glazing rebates which will accept 16mm sealed unit glazing and these units will have to be ordered in advance. Other glass is generally held in stock.
When selecting a door for external use it is essential to purchase one which is of the correct thickness i.e. 40mm or 44mm depending upon type, so that you can be sure it will be strong and sturdy enough to withstand the weather conditions to which it will be subjected.
Internal doors are thinner - approx. 35mm - and again panelled doors are available in a number of sizes and styles and so are flush doors.
To a large extent the style of your house and your own personal taste will determine the style of door that you choose but it should be remembered that a largely glazed door, internal or external, can provide the means to get additional light into darker parts of the house.
To find out which door size you require when using an existing frame, simply measure the opening rebate in the frame, both height and width, or the size of the present door. Purchase a new door of suitable size bearing in mind that the new door may initially be slightly oversize. External doors can be reduced in height and width by 26mm. This must be taken off equally ie a maximum of 13mm off each edge.
Flush doors can be reduced less than solid timber doors. On flush doors you should not remove more than 5mm from any side. If you remove more than these amounts you will seriously weaken the structure of the door leading to warping or twisting. Under these circumstances your guarantee will be invalid. Always check door labels for details on trimming. You'll also need to purchase new hinges and other door furniture plus glass, if required. Brass furniture is recommended on all external doors and internal hardwood ones.
When you have all the materials on site, the old door can be removed. This must be done with care to avoid damaging the frame especially around the hinge housings. Open the door at 90° to the frame and put wedges under it to support it.
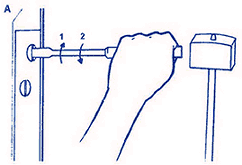
Slightly loosen all the screws holding the hinges to the frame jambs. The slots in the old screws may well have been filled with paint over the years and this must be removed to enable the screwdriver to get a good grip. If the screws have rusted they may be difficult to loosen. If this is a problem, fit the tip of the screwdriver into the screw slot, then strike the end of the driver sharply with a mallet whilst exerting turning pressure first clockwise then anti-clockwise, on the screw - as Diagram below.
 This will often break the grip of the rust and the screw can be extracted. Remove the screws holding the bottom hinge first, then remove all but one of the top screws. Only remove this last one when sure you can support the door adequately.
Taking care not to damage the timber around the hinge housing remove the door and put aside. It will have to be temporarily replaced later. If it was a good fit in the frame it can be used as a template for the new door if this has to be cut. This is particularly valuable if the frame is badly out-of square and the new door has to be unusually shaped to fit. Offer the new door into, or at least against, the opening to check the fit. If you are lucky it will slot into the opening perfectly with a clearance of about 2mm all round.
It is, however, more than likely that some size adjustments will have to be made and the height should be dealt with first. Check that the frame is square and then measure the height at each side.
See other related pages:- Fitting a door frame - Glazing doors - Hanging doors
Whilst every care has been taken to ensure that the product design, descriptions, specifications and techniques of construction are accurate at the date of printing. Wickes products will inevitably change from time to time and the customer is advised to check that the design, descriptions, specifications and techniques of constructing any of the products described in this leaflet are still valid at the time of purchase or placing an order. © Wickes Building Supplies Limited 2000. All rights reserved. DIYData.com has Wickes permission to reproduce this article.
All rights reserved. No part of this publication may be produced or transmitted in any form or by any means electronic, mechanical, photocopying, recording or otherwise or stored in any retrieval system of any nature without the written permission of the copyright holder and the publisher.