Hanging a door
The basic techniques for hanging a door are the same for internal and external types, the only major difference being that an internal door is generally cut heightwise in order to open freely over carpeting or other floor coverings whereas an external door is cut to fit between the head (top) and sill (bottom) of the frame. An internal door frame does not have a sill.
Below the fitting of an external door is described in most detail.
The first job to be done is to have a good look at the existing frame.
With an external replacement particularly, there is no point in fitting a new hardwood door into an old, perhaps rotting, frame with a well worn sill. Nor will an attractive natural hardwood door look good in an old painted softwood frame.
Fitting a new hardwood frame is, therefore, advisable and matching pre-treated hardwood frames are available from Wickes for their 6' 6" x 2' 6", 6' 6" x 2' 9" and 6' 8" x 2' 8" external doors, fitting into brickwork openings of 6' 10" x 2' 10", 6' 10" x 3' 1" and 7' 0" x 3' 0" respectively with a little clearance all round.
Checking/cutting the new door
When these frames are used and correctly installed, the doors will often prove to be a perfect fit with no cutting to size required but timber tolerances may lead to some shaving being necessary for a perfect fit.
See this other page for installation of a new door frame.
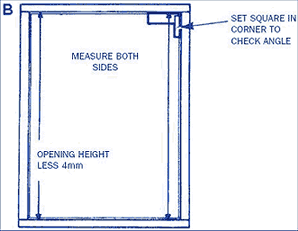 Measure the inside height of the door frame, on both sides, and deduct 4mm from each measurement (Diagram B). Mark the resulting size on the door, measuring from the top since excess timber should be removed from the bottom rail.
NOTE: On flush doors only, an equal amount should be taken from the top and bottom, not all from the bottom. Note that external carved doors with glazed panels are always fitted so that the glass is installed from the inside of the house. When measuring prior to cutting, ensure that the door is the right way round. This is particularly important when the door frame is longer on one edge than the other. When the excess has been removed, reposition the door with the hinge stile (the vertical section of the door frame which will be fitted with the hinges) tightly up against the hinge jamb (the vertical part of the frame on the side where the hinges will be). Note that with flush doors there will sometimes be a stamped mark on one edge, or the top of the door, indicating the position of the built-in lock block. The edge opposite this mark is the hinge stile. With an assistant holding the door in place from the inside, mark a line using a soft pencil down the outside face of the door where it touches against the locking jamb. Remove the door again and measure from the hinge stile to the mark on the locking stile. Deduct 4mm from this measurement. This will give you the correct finished width of the door.
Now, cutting equally from each edge, remove the excess timber with a plane. When planing a flush door on the stamped lock block edge, always make a note on the face of the door perhaps using adhesive tape to indicate the position of the lock block before planning off the stamped mark. Repeatedly reposition the door in the frame to ensure that you do not plane off too much timber. When the door fits with a clearance of 2mm at each side all the way down, the cutting is almost finished.
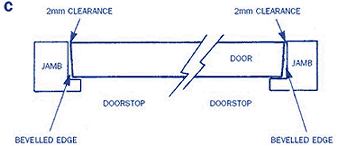 The plane should be used finally to create a slight bevel on the stile edges towards the door stop - as diagram C. Before bevelling, check again that the door is the correct way round for glazing. Finally, sand the cut edges and corners of the door to remove sharp edges. Use a medium/fine grade of glasspaper for this.
Fitting the hinges
Cutting the hinge housings is the next job. For hardwood external doors and glazed internal doors, you will need to use three 100mm brass hinges. These should be fitted 230mm from the top and bottom of the door and in the centre but if the existing hinge housings on the frame are to be used again, then measuring is not required. Simply check that the new hinge screw holes are correctly aligned with the old holes. Fit the hinges to the frame jamb using just one screw in each hinge. It may be necessary to slightly recut the housings to accommodate the hinges.
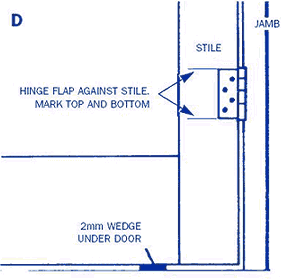 Open the hinges and insert the door into the opening. Wedge the door in place so that it is raised 2mm above the sill and is 2mm below the head of the frame. Close the hinges against the face of the door and mark their positions. Diagram D.
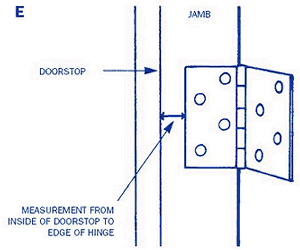 Remove the door. Measure the distance from the doorstop on the frame to the nearest edge of each hinge. Diagram E.
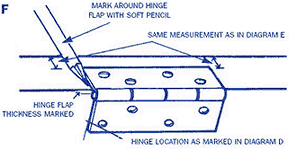
Transfer this measurement to the door working from the face which will be against the doorstop, and mark in line with the intended hinge positions. Remove the hinges from the jamb and position on the door stile again in line with the marks made earlier. Draw around the hinge arm. Also, mark the hinge thickness on the face of the door. Diagram F.
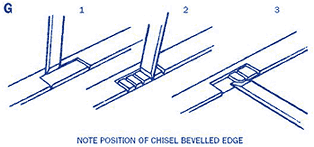 Cut out the housing using a sharp bevelled edge chisel following the sequence as in Diagram G. Fit the hinges using one screw only in each. Pilot holes should be made for the screws to prevent them splitting the timber. Using wedges to support the door, hang it in place with, again, just one screw holding each hinge in the jamb housing. Check that the door closes correctly with clearance all round. If necessary, remove the door and adjust the depth of the hinge recesses until a perfect fit is achieved.
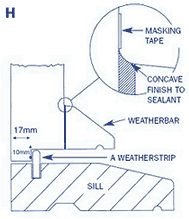 An inward opening external door should at this stage have a rebate cut along the front bottom edge as shown in Diagram H in order to accommodate the sill weatherstripping and create a good seal.
The rebate would be on the opposite side for an outward opening door. A weatherbar should also be fitted to the outside face of the door to throw rainwater off. Run a length of masking tape across the door with the bottom edge of the tape where the top of the weatherbar will be. Run a bead of All Purpose Silicone sealant along the edge of the weatherbar then screw it in place and smooth off to a concave finish. Remove the masking tape immediately - see Diagram H.
You must now remove the door and temporarily refit the old one until the new one has been stained/painted. A new hardwood door must then be treated with at least one coat of Wickes High Performance Woodstain on all cut surfaces paying special attention to the top and bottom edges. Lock and hinge housings should also be basecoated as should glazing rebates and holes for letterplates. No timber should be left untreated. When this woodstain has dried, the entire door should be given three coats of Wickes High Performance Woodstain. It is very much easier to apply these treatments to the door before it is finally hung and it ensures that it is well protected before having to face the weather.
Failure to treat any external door before it is hung will lead to the absorption of moisture which will cause the door to swell and perhaps even become distorted. Never forget the top and bottom edges. The sooner it is treated the better and the treatment should be the same on both sides of the door. If you use a microporous finish on the outside, you must do the same on the inside.
When the Wickes High Performance Woodstain has dried the door can be hung again with all hinge screws being driven in.
An alternative treatment would be with Wickes Quick Drying Woodstains which are available in a range of colours, but, again, every single surface of the door must be treated.
Locks and latches
Once the door is hung, locks or latches and the other door furniture can be fitted. For security reasons it is recommended that a front door should be fitted with (a) a cylinder rim lock, (b) a 5-lever mortice deadlock to BS 3621 for use when the house is unoccupied and (c) a security chain or door viewer.
A back door should have a mortice sashlock to BS 3621 fitted along with two security rack bolts.
No locks should be cut into doors in line with any centre or off centre horizontal mid rail since this will weaken the joint possibly causing separation of the joint and a breakdown in the surface protection.
Such action will invalidate your guarantee. If an outward opening door has been fitted, with the vulnerable hinge pivots accessible to an intruder, a pair of Wickes hinge bolts should be fitted to prevent the intruder lifting the door out of the frame after removing the hinge pins. All locks are supplied with full fitting instructions.
See other related pages:- Choosing doors - Fitting a door frame - Glazing doors
Whilst every care has been taken to ensure that the product design, descriptions, specifications and techniques of construction are accurate at the date of printing. Wickes products will inevitably change from time to time and the customer is advised to check that the design, descriptions, specifications and techniques of constructing any of the products described in this leaflet are still valid at the time of purchase or placing an order. © Wickes Building Supplies Limited 2000. All rights reserved. DIYData.com has Wickes permission to reproduce this article.
All rights reserved. No part of this publication may be produced or transmitted in any form or by any means electronic, mechanical, photocopying, recording or otherwise or stored in any retrieval system of any nature without the written permission of the copyright holder and the publisher.

