
Repairing staircases from above
The preferred method of repairing creaking staircase treads is from below (see this related page), however this is not always possible; the underside may be obscured by plasterboard or another type of covering.
Where the underside of the staircase cannot be accessed, repairs can be made from above the treads as shown here.
Securing the front of a tread to the top of a riser
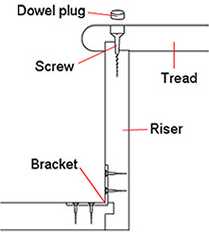 Drill a number of clearance holes (for an average stair width, 3 holes - one either side about 4 inches in from the sides, and one in the middle) through the tread, over the middle of the riser.
Counter bore the top of the hole to take a suitable dowel plug after the screws have been fitted.
Try and get some woodworking glue into the joint between the top of the riser and the underside of the tread, this won't be easy but putting a quantity into each hole and 'working' the front of the tread up and down will help.
Fit 38mm (1.5 inch) screws in each of the holes and fit the covering dowels using glue.
Securing the back of a tread to the bottom of a riser
Fit brackets as shown above between the bottom of the riser and the back of the tread - for an average stair width, fit 3 - one either side about 4 inches in from the sides, and one in the middle. Position and mark the brackets and use a chisel to allow the brackets to recess into the timber so that the front is flush.
Try and get some woodworking glue into the joint, this won't be easy but brushing a quantity along the back of the tread and 'working' the front of the riser back and forwards may help.
Fit the brackets using suitable screws - to determine the screw lengths, the thickness of tread can be seen at the front of the tread, risers tend to be made of the same thickness or slightly thinner timber.