
Cutting ceramic wall tiles
general tile cutting - straight tile cuts - irregular tile cuts
Cutting ceramic wall tiles - general:
Unless tiles are of a single, plain colour, there will be a pattern; even if it is hard to recognise at first.
This pattern should be used to determine the top of the tiles - do not rely upon the impression on the back of the tiles as this is not always consistent.
When marking tiles to cut, make sure that the pattern on each tile is the same way up as the others.
In general, a thicker tile will be harder to cut than a thinner tile and you can expect more failed cuts with thicker tiles.
Using thicker tiles will increase the justification for hiring 'professional' cutting equipment.
When marking tiles use a pencil or crayon, do not use felt-tipped markers as the ink may cause discolouration when the tiles are grouted.
The cut edges of tiles are sharp, take care when handling them.
Straight cuts
Straight cuts on most tiles can be achieved using simple tools, just a steel straight edge and a handheld tile cutter.
Measure the tile to cut
Each tile should be measured separately, don't assume that the gap between a row of tiles and the adjacent surface (wall, ceiling or skirting board) will be consistent - it won't be.
To measure each tile to cut, place it glaze side down on the adjacent tile and slide it towards the adjacent surface leaving a gap of about 3mm (1/8 inch) - this will provide room to grout the tile along both edges.
Using a pencil or crayon, mark the edges of the tile where it lines up with the edge of the existing positioned tile.
Cutting the tile
 Remove
the tile to a flat surface, line up a steel straight edge on the front surface of the tile to the edge marks.
Remove
the tile to a flat surface, line up a steel straight edge on the front surface of the tile to the edge marks.
Using a suitable, handheld tile cutter, make one strong pull across the tile to score the glaze.
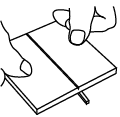 Working on a flat, solid surface, line up the tile (glazed side up) with a match sticks under each end of the scored line.
With a hand on each half of the tile, apply firm downwards pressure to break the tile along the scored line.
Alternatively (especially if you have a large number of tiles to cut), use a tile cutting machine - some cheaper models do not work very well but most Hire Shops offer professional type tile cutters which can make life easy.
Irregular cuts
Irregular shapes are harder to achieve than straight cuts and will require the use of a special tile saw and/or tile nippers (an alternative to tile nibblers is a standard pair of pincers). Don't try to achieve complicated shapes too accurately, filling in the edge with grout will provide a suitable finish.
 A tile saw generally looks a bit like a hack saw, with a frame holding the ends of a special tile cutting blade (the blade is round in section with cutting edges on all sides).
When using a tile saw, always work from the glazed side of the tiles and make the cut on the down stroke.
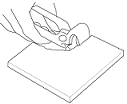 Tile nibblers are hand tools which break off a small piece of tile when the handles are squeezed together, as mentioned above, a pair of woodworking pinchers can be used instead.
When using nibblers or pinchers, don't try to make too large a cut at one time, it's better to nibble away small pieces of tile slowly.
Typical irregular shapes.
Holes for pipes.
 Where a pipe comes in the middle of a tile, measure the position of the pipe after the tile below has been positioned. Take the vertical measurement for the centre of the pipe with the tile positioned (glazed side up) on the fixed tile (allow a vertical adjustment for the tile spacing), and the horizontal measurement by placing the tile under the pipe and lined up with the fixed tile.
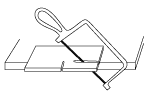
With the pipe centre marked on the two edges, draw lines on the glaze to establish the centre of the pipe on the tile. Draw a circle at least 3mm (1/8 inch) bigger all round for the pipe (the additional size will allow space for the grout).
Draw parallel lines from both side of the circle to the nearest edge of the tile - this will reduce the amount of cutting required.
Using a tile saw, cut along one of the lines from the edge of the tile to the edge of the marked circle.
Then cut the tile along the other line from the tile edge.
Using a handheld tile cutter, score the glaze between the two inner ends of the cuts, put a match stick under the score mark and a gentle tap of the centre off-cut will detach it from the tile.
Using a tile saw, cut out the remaining semicircle of waste.
Depending on how far the pipe position is from the tile edge, the pattern of the tile, and also how visible it will be when the tile is fitted, you may wish to use the first off-cut to fill in the space left in the tile (rather than filling with grout) - the two options to do this are to cut along the line of the circle marked on the off-cut using a tile saw, or to square off the off-cut to the outside of the circle using a straight cut with a handheld tile cutter.
Note:
Some people may suggest that to achieve a hole for a pipe in a tile, the tile should be straight cut along the centre line of the pipe and a half circle cut out of both cut edges - then the two halves are fitted from either side of the pipe. This method does not work - while it will fit around the pipe, trying to join the straight, broken parts of the tile back together is impossible and there will not be any space for grouting along the straight parts of the cut.
Cutting a corner.
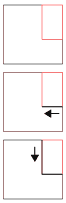 Where a corner of a fitting etc comes in the middle of a tile, measure the position of the corner after the tile below has been positioned. Take the vertical measurement for the edge of the corner with the tile positioned (glazed side up) on the fixed tile (allow a vertical adjustment for the tile spacing and allow at least another 3mm (1/8 inch) for the finishing grout), and the horizontal measurement by placing the tile under the corner and lined up with the fixed tile, again allow at least another 3mm (1/8 inch) for the finishing grout.
With the corner marked on the two edges, draw lines on the glaze to establish the line of the corner on the tile.
Option 1 (the safest).
Using a tile saw, cut along the shortest line from the edge of the tile to the corner.
Then make the second (longer) cut using the tile saw so that the saw cuts meet.
Option 2 (quicker but keep your fingers crossed!).
Using a tile saw, cut longest line from the edge of the tile to the corner.
Then use a straight edge and a handheld tile cutter to score the glaze along the shortest line - make sure that the cutter makes a definite score into the saw cut.
With the tile firmly on a flat surface and the score line over a sharp edge, gently knock the waste piece - it should break along the scored line.
A piece out of the corner.
 Where the corner of a tile needs to be removed so that it will fit, draw the shape required on the tile - remember to allow for at least a 3mm (1/8 inch) gap between the obstruction and the finished tile profile for grouting.
Use a straight edge with a handheld tile cutter to score the glaze along a line to remove most of the waste - make sure that the cutter makes a definite score into both edges of the tile.
With the tile firmly on a flat surface and the score line over a sharp edge, gently knock the waste piece - it should break along the scored line.
Now use tile nibblers (or woodworking pinchers) to slowly remove the remaining waste in small pieces - it can help to score the finial required line.
Irregular edge.
 You have to decide how close to an irregular edge you wish to follow - if the position is highly visible, you may wish to make an elaborate cut rather than making a simpler cut and filling in with grout.
The basic method is as for taking a piece out of a corner of a tile - cut off most of the waste then nibble away the remaining.