
Sound proofing a floor
Noise from neighbouring flats, either over or under yours, can be quite a problem. Property converted before June 1992 often had little or no sound proofing at the time of conversion so would benefit from installing some.
Noise is carried by vibrations, either through the air or through the structure of the building.
Referring to 'sound proofing' is a bit of a misnomer, it would prove very difficult to full sound proof a floor/ceiling, the best that can be reasonably expect is to reduce noise intrusion to an acceptable level.
To reduce noise, the vibrations must be isolated from the area. With floors/ceilings there are two options, either isolate the structure above the floor or below, each has its own advantages and drawback.
Sound proofing below the ceiling
Sound proofing above a floor requires fitting layers of various noise deadening materials. The disadvantages are that:
- It raises the level of the floor thus requiring doors etc to be adjusted to clear the raised floor level;
- It requires removal of the existing skirting board and its replacement;
- It may be necessary to slightly raise any electrical outlets positioned above the original skirting board;
- Any need to access services in the floor void (electrics, central heating etc) after the floor has been completed will be a real pain.
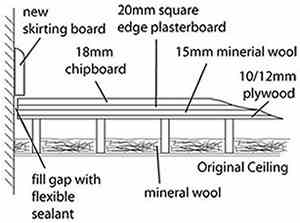 A
typical method of sound proofing a floor is shown to the right.
A
typical method of sound proofing a floor is shown to the right.
Sound proofing above the floor
- The first thing to do is to remove the existing skirting boards, doors and floorboards.
- Fit mineral wool quilt between the joists.
- Either refit the original floor boards or cover the joists with sheets of 10 to 12mm plywood keeping a gap (5mm or so) between the flooring and the walls. Secure to the joists using nails.
- Cover the floor with 15mm mineral wool quilt, if you need to secure this to keep it flat, use an occasional 'dab' of adhesive under the quilt.
- Loosely cover the quilt with 20mm square edge plasterboard, do not secure this to the quilt and keep a gap between it and the walls.
- Cover the plasterboard with 18mm tongued and grooved flooring chipboard panels. Glue the chipboard together along the tongue and groove. Keep a gap between the chipboard and the walls.
- Fit a closing strip across the doorway where the edge of the 'sandwich' is exposed, leave a gap between the strip and the new floor.
- Fill the gap between the edges of the flooring 'sandwich' and wall/closing strip using a flexible sealant.
- Refit the skirting board (or fit new) leaving a gap (5mm or so) between the top of the floor and the bottom of the skirting board.
- Adjust the bottom of the door(s) as necessary to suit the new height of the floor and refit.
The soundproofing floor is now complete, ideally it should be covered with carpet using a heavy duty underlay to further improve the noise deadening characteristics of the floor.
Other options
There are commercial 'floor noise reduction' systems available, the main difference being that the 10mm mineral wool quilt and plasterboard are replaced by specially produced noise absorbent material. These systems often raise the floor by a smaller amount that the system explained above, but adjustment to skirting and doors will still be necessary.