Replacing slates
Safety: Working on a roof involves working at height (even on a bungalow), so always use scaffolding or other stable platform, never use just ladders.
Of all roof covering, good quality slate has one of the longest design life (100 years plus), but over time they can become damaged or loose - damaged slates are generally due to the roof settling, frost damage or objects falling on them (often pieces of tree or similar) - loose stales are often the result of failure of the nails securing them (a problem known as 'nail sickness').
Often damage will be limited to an isolated slate which is damaged. Where a single slate becomes loose because of 'nail sickness', it is generally an indication that the roof is reaching the stage where complete re-roofing will soon be needed.
An isolated damaged slate.
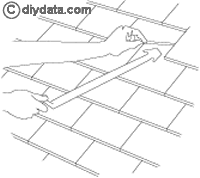
 Use a slate ripper to cut or pull out the nails;
- Slide the ripper under the damaged slate and work it up so that one of the cutting edges is hooked around a nail.
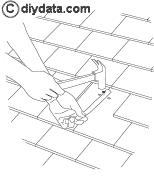
- Try pulling hard on the ripper to break the nails; if this is unsuccessful, hold the lower end of the tool away from the slate surface and use a hammer against the front of the handle to apply extra force.
- Pull out the damaged slate, if necessary lever up the adjacent slates so that the damaged slate will move.
- Make a 'tingle' using a thin, 25mm (1 inch) wide strip of lead; for the length, measure down the roof from the batten between the slates underneath to about 50mm (2 inch) below the bottom edge of the slate to be replaced.
 Fix one end of the tingle to the batten in the gap between the two slates underneath - use a short non-corrosive nail so as not to puncture the underfelt.
- Gently lift the slates in the row above and slide in the replacement slate so that the bottom edge aligns with the adjacent slates - note that the lower edge of some slates are chamfered, the chamfer should be uppermost. Keep the replacement slate as flat to the roof as possible as it needs to pass over the first batten and rest on top of the next batten up.
- With the slates in their final position, bend the lower part of the tingle back up onto the front face of the slate to prevent it slipping.
An isolated slipped slate.
An isolated slipped slate may indicate that the roof is beginning to suffer from 'nail sickness'; all the slates would have been put up with the same type of nails at the same time, so once one nail fails, the others won't be far behind. Usually 'nail sickness' will be indicated by a number of slates being out of line - one nail may have failed on a number of slates allowing them to twist. Replacing a slate on a roof which is suffering from nail sickness must be recognised as a temporary solution as the roof will eventually need to be replaced.
To replace an isolated slipped slate:
- If only one nail has failed (so that the slate twists rather than slips out completely), use a slate ripper to cut or pull out the remaining nail;
- Slide the ripper under the damaged slate and work it up so that one of the cutting edges is hooked around the nail.
- Try pulling hard on the ripper to break the nails; if this is unsuccessful, hold the lower end of the tool away from the slate surface and use a hammer against the front of the handle to apply extra force.
- Pull out the slate, and look at the nail holes - if either hole has been enlarged by flaking, it may be that the particular slate is weak and wind etc has allowed the nail to rub it away. If the holes don't show any serious signs of enlargement, it's another sign of 'nail sickness' - i.e. the nail, rather than the slate, has failed.
- Make a 'tingle' using a thin, 25mm (1 inch) wide strip of lead; for the length, measure down the roof from the batten between the slates underneath to about 50mm (2 inch) below the bottom edge of the slate to be replaced.
- Fix one end of the tingle to the batten in the gap between the two slates underneath - use a short non-corrosive nail so as not to puncture the underfelt.
- Gently lift the slates in the row above and slide the slate back into position keeping it the same way round as it was originally fitted so that the lower edge aligns with the adjacent slates. Keep the slate as flat to the roof as possible as it needs to pass over the first batten and rest on the next batten up.
- With the slate in its final position, bend the lower part of the tingle back up onto the front face of the slate to prevent it slipping.
