
Removing a radiator.
radiator valves - isolating - draining - disconnecting - removing - refitting
Sometimes you may want to temporarily remove a radiator, perhaps to replace it with a new one, or repair the wall behind.
You shouldn't need to remove a radiator just to decorate (paint or wall paper) behind it.
Painting can normally be done using a small paint roller with a long handle; you can normally cut slits in wallpaper to suit the radiator brackets and push the paper down behind the radiator.
Having said that, removing a radiator to wall paper behind can give a better result.
Radiator valves
Any radiator will normally have two valves, one at each end - at the inlet and outlet of the radiator.
One of these valves will be for every day control (either a manual or a thermostatic type) while the other valve will be a lockshield valve which restricts the maximum flow of water through the radiator and is used to balance the system.
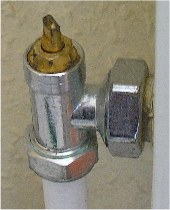
 It is far easier to remove a radiator where the lockshield incorporates a drain off point (shown right), however where no drain off point is incorporated it is still possible to remove the radiator without having to drain down the whole system - it's just more awkward and potentially more messy.
Be aware that thermostatic valve sometimes tend to leak even when fully closed, so a capping to completely seal them off is a good idea if the radiator is going to be left disconnected overnight or longer.
The tools needed to remove the radiator are:
- A large adjustable spanner or spanners which will fit:
- The lockshield valve - this is usually very thin and wide, an adjustable spanner is best suited.
- The large Union nuts which connect the valves to the radiator
and - The drain off point (if fitted).
- A radiator bleed key.
- A bowl, bucket and a short length of hose pipe.
You should also spread a dust sheet and/or newspapers on the floor under the radiator as there will inevitably be some water spillage - a plastic sheet underneath will provide added protection.
Isolating the radiator
- Start by closing by hand the main control valve on the radiator by turning it clockwise.
 Now use a tool to close the lockshield valve by turning it clockwise - the lockshield is usually covered by a cover which will need to be pulled off vertically. Carefully count and note the number of turns required to shut the lockshield valve as this determines the balance of the system and it will need to be opened to the same position when the radiator is replaced.
Draining the radiator
If the lockshield has a drain off point:
- Either connect a length of hose pipe to the drain off point and run the hose to the outside of the premises keeping the hose below the level of the radiator OR position a bowl under the drain off point.
- Open the drain off point using a suitable spanner and open the bleed valve at the top of the radiator
- Allow the radiator to drain - if using a bowl to collect the water, you will find that it needs to be emptied a few times as it fills up - so keep an eye on it and shut off the drain off valve when it needs to be emptied, ideally into a bucket kept near.
If the lockshield does not incorporate a drain off point:
- Position a bowl under one of the union nuts holding the valves to the radiator
 Open the bleed valve at the top of the radiator and, using a suitable spanner, loosen the union nut - you will need to hold the valve steady to prevent it from rotating and you may need to wriggle the valve to break the seal. Take care not to loosen the nut too much and this could result in the water flowing uncontrollably.
- Allow the water to drain into the bowl, you will find that it needs to be emptied a few times as it fills up - so keep an eye on it and tighten the union nut when the bowl needs to be emptied, ideally into a bucket kept near.
Disconnecting the radiator
When the water has drained from the radiator, the two union nuts connecting the valve and lockshield to the radiator can be disconnected by using a suitable spanner - you will need to hold the valves steady to prevent them from rotating and you may need to wriggle each valve to break the seal. Keep a bowl under the union nut as it is undone as some more water will be released.
Removing the radiator
You should now be able to lift the radiator up and off of the mounting brackets - there will still be some, probably very dirty, water remaining on it, so try to keep the radiator level as you lift it and have a bucket handy so that one end of the radiator can be tipped into it to receive this water.
Use some form of capping to seal off the thermostatic valve if fitted.
Cover the valves with plastic bags to prevent the ingress of dirt etc.
Refitting the radiator
To refit the radiator:
- Remove any capping fitted to a thermostatic valve and plastic bags fitted over the valves.
- Lift the radiator back onto the mounting brackets - make sure it is positioned horizontally so that the valves meet the radiator connections.
- Fit each valve in turn into the connection on the radiator and fit the union nuts, first tighten them by hand and then fully tighten using a suitable spanner - you will need to hold each valve steady as the union nut is tightened to prevent it from rotating.
- Make sure that the central heating pump is switched off and the bleed valve is closed.
From here on, keep an eye open for leaks from the union nuts and other joints - if any are seen, try to tighten up the joint.
- Open the lockshield valve by the same number of turns as it was originally closed.
- Open the manual or thermostatic valve.
- Open the bleed valve at the top of the radiator to allow the trapped air to escape, close the bleed valve when water appears.
- On closed loop central heating systems, check the system pressure and top up.