
Syphon lavatory cisterns - replacing a flap valve
When a syphon cistern fails to flush satisfactory, one reason may be a damaged flap valve preventing enough water being lifted into the downpipe to start the syphon. This can occur suddenly although more often the flush will gradually get worse.
Before thinking about replacing a flap valve, it is worth checking the water level within the cistern, a low water level can give similar symptoms - the water level should be about 12mm (½ inch) below the overflow outlet.
Replacement flap valves for most syphons are available from DIY or hardware stores, but they do vary in shape and size. As a last resort a new, oversized flap valve can be cut to size.
Having confirmed that the likely cause of the problem is a worn cistern flap valve, and obtained a suitable replacement flap valve, the procedure depend upon whether the lavatory suit has a high/low cistern or a close couple arrangement.
High or Low cistern arrangement:
- Turn off the cold water supply to the cistern and flush it empty (if the cistern is fed direct from a tank (i.e. where there is not shut-off valve in the pipe), it may be possible to tie up the ball-valve arm to temporarily shut off the water to the cistern rather than drain the whole tank).
- To avoid a mess, use a cloth (or sponge/rags) to mop out the remaining water in the bottom of the cistern.
- Within the cistern, locate the lifting link between the vertical rod and the handle/chain rocker - disconnect the link but leave it attached to the top of the vertical rod.
- Working under the cistern, unscrew the fitting to the down pipe, there is no need to fully remove the down pipe.
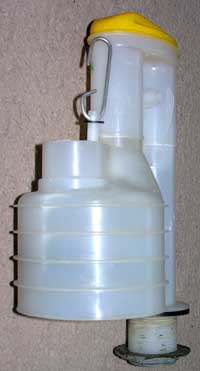
- Under the cistern, undo the very large syphon securing nut; as the nut is turned, the syphon will need to be held within the cistern to avoid it rotating.
- Once the syphon is released, lift it out of the cistern making sure that it clears the ball valve mechanism as in some cisterns there is little space. In some cisterns, removing the float from the end of the arm may make removal of the syphon easier.

- With the syphon on a table/bench:
- Remove the lifting link from the vertical rod and any washer fitted over the top of the rod.
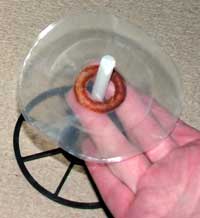
- Allow the perforated disc to drop out of the bottom of the syphon reservoir.
- Remove any washer and weight from around the vertical rod (noting their positions).
- Remove the old flap valve from the perforated disc.
- Reassemble using the new flap valve and making sure that all parts are fitted in their original positions.
- Finally, refit the perforated disc assembly in the syphon reservoir and fit any washer and the lifting link.
- Clean any hardened plumbers jointing compound which was previously used to seal the joint from the bottom of the syphon and the cistern (inside and out).
- Refit the syphon to the cistern using fairly generous quantities of plumbers jointing compound on the joint and making sure that the large rubber washer is fitted between the bottom of the syphon and the inside of the cistern. Before fully tightening the nut under the cistern, make sure that the position of the syphon will not obstruct the vertical movement of the ball-valve arm.
- If appropriate, refit the float to the valve arm.
- Reconnect the lifting link to the cistern handle/chain rocker.
- Reconnect the down pipe to the bottom of the syphon under the cistern.
- Turn on the water supply to the cistern (or release the ball-valve arm) to allow the cistern to refill.
- Job done.
Close couple cistern/pan arrangement:
The only real difference is that the cistern must be removed from the pan before the syphon can be removed from the cistern.
- Turn off the water supply to the cistern, if it is fed direct from a tank without a shut-off valve, the tank will need to be drained. If you have to drain a water tank, it is an appropriate time to also fit a shutoff valve in the outlet pipe from the tank so that any future work on the cold water system will not require the tank to be drained.
- Once the water supply is turned off/drained, flush the cistern and disconnect the supply coupling to the ball-valve.
- Disconnect the overflow from the cistern.
- Normally, the cistern is fixed to the wall and to the pan, release the fixings to the pan first and then those to the wall.
- Carefully lift off the cistern and tip it over the pan to discharge any water left in the bottom of the cistern.
- The syphon can now be removed from the cistern and the flap valve replaced as described above.
- When the syphon has been repaired and reassembled in the cistern, the cistern can be refitted to the pan making sure that the large 'doughnut' washer (if originally fitted) is located between the underside of the cistern and the pan around the syphon outlet.
- Make sure that the overflow and water input line up with the cistern fittings and secure the cistern to the wall and pan (do not over tighten the fixings to the pan).
- Reconnect the overflow and water supply pipes to the cistern fittings.
- Turn on the water supply to the cistern to allow the cistern to fill up.
- Job done.