
Three layer Felt Roofing
using cold applied adhesive
Laying a felt roof is within the capabilities of most diy people providing that the process is understood and the job is not rushed. Check out the 'skill level' (above).
The sequence of laying a felt roof is:
- Preparing the roof.
- Laying the first, nailed, layer of Underlay felt. This layer is not bonded to the decking so that the decking can move without damaging the felt roof.
- Laying the second, bonded, layer of Underlay felt.
- Installing any gutter drips.
- Laying the top bonded layer of Top Sheet felt.
- Installing any verge edge and edging to a vertical wall and flashing.
- The finishing touches.
Possibly the biggest challenge to felt roof construction are the edges, three possible edge situations normally arise:
- Where the edge of the felt drains into a gutter. There will generally be at least one edge of the roof like this - see edge detail 1.
- Where the edge of the roof does not feed into a gutter and does not abut a higher, vertical wall - these are referred to as 'verge drips'. These edges are built up using a triangular fillet of timber and a higher fascia board with a felt lip overhanging to prevent any rain water from going over the edge - see edge detail 2.
- Where the roof butts up to a vertical wall. In this case a triangular fillet of timber is fitted along the join of the roof/wall to allow the felt to be run up the wall, with the top of the felt being covered by flashing - see edge detail 3.
Two basic types of roofing felt material are required:
- Underlay - this is usually supplied sand coated (to prevent the layers bonding together within the roll during storage), this should be used for all layers except the top layer.
- Top Sheet - the finish, one side is plain for bonding to the underlayer, the other side normally has some form of protection finish, mineral chippings or some form of grit.
Although these are the two basic types of felt, there are numerous different specifications available for each type - these provide different types of material/finish/ thickness - normally quoted as weight per square metre.
Light weight shed roofing felt is not suitable for flat roof construction.
Preparation
The underlying deck must be constructed of moisture tolerant materials such as 18mm WBP plywood (or suitable Chipboard/Stirling Board) on treated timber joists.
New Roofs: Make sure the roof is clean, dry and that all nail heads are flush with the deck.
Existing Roofs: Remove all existing felt, nails and adhesive - make sure that the deck is sound, dry and free from projections (such as nail heads or split wood where old nails have been pulled out). If the deck is wet or rotten, allow it to dry out and repair as appropriate.
Before starting to lay the felt over the main roof deck, consider the arrangement which you will require for the edges, these generally take a disproportionate amount of time as they can be fiddly. Fix the edging timber as appropriate:
- Triangular fillet for upstands.
- Triangular fillet with raised fascia and wooden batten for edge verges.
- Wooden batten for gutter drips.
If there will be a need to chip out mortar or similar work associated with the edging, carryout this work before laying any felt and clean away all debris from the deck.
Professionals will not normally remove any guttering from around the roof; however this is not a 'hard and fast' rule - it can often be easier in the long run to remove the guttering if it can be easily removed/replaced.
Laying the first layer of felt
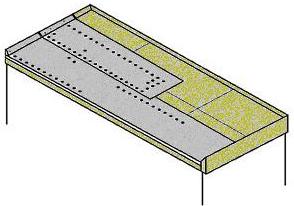 The
first layer of felt is Underlay quality and must be nailed to the wooden decking, not bonded with adhesive. The wood will move
with changes in temperature/moisture or when it is walked upon.
The
first layer of felt is Underlay quality and must be nailed to the wooden decking, not bonded with adhesive. The wood will move
with changes in temperature/moisture or when it is walked upon.
Ensure that the decking is free of any debris. Ensure that your shoes do not have any sharp projection on the sole; you'll need to walk on the laid felt and you don't want to damage the laid felt.
Starting at the lowest edge of the roof, roll out the Underlay at right angles to the direction of the full. Align, measure and trim to size (to trim the felt, mark the length by a nick in the edge of the roll, place the cutting board under the felt and using a straight edge, cut across the width of the roll with a sharp knife).
Make sure that the felt is correctly aligned and flat. Then starting at the centre of the sheet and working towards the edge and end of one half, randomly nail using large head galvanised clout nails at about 150mm (6 inch) centres but do not put the nails along the edge which will be overlapped by the second strip. As you work away from the centre, 'spread' the felt away so that it is flat against the decking. Repeat this on the other half of the sheet.
When the first run is complete, roll out the felt and measure/ cut for the second strip. Lay it out alongside the completed strip overlapping the second strip about 50mm (2 inch) on top of the first strip. Nail the second run of felt in the same manner as the first; starting at the middle/centre and working towards the edge/end. Where the edge of the strip overlaps onto the first run, nail through both sheets at 50mm (2 inch) centres.
If (when) you need to join strips along a run, allow a 100mm (4 inch) overlap and nail across the overlap at 50mm (2 inch) centres. Ensure that where joints are required along adjacent runs, that the joints do no coincide.
Lay and fix further strips of underlay using the same technique until all the roof is covered. For the final run across the roof, the width of the felt will probably need to be cut to size, measure at both ends and in the middle to ensure that any irregularities of the roof are taken into account. Measure and cut the felt before starting to fix the sheet.
Laying the second sheet of felt
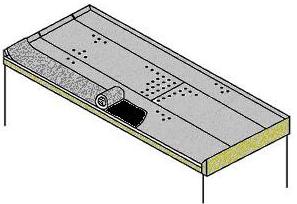 The
second layer is another layer of Underlay felt but this one is bonded by adhesive to the first nailed layer.
The
second layer is another layer of Underlay felt but this one is bonded by adhesive to the first nailed layer.
It is essential that the joins do not coincide with those of the first layer. This can be avoided by starting the second layer with a half width roll, or if necessary a full width sheet can be cut down to suit after it has been cut to length.
Roll out the felt; align, measure and cut it to length. Roll back one half of the length of the sheet to the centre of the roof, taking care to maintain the sheet alignment.
Following the manufacturer's instructions, apply the adhesive to the first nailed layer. Coat an area slightly wider than the width of the felt being laid.
After the required time has elapsed (as specified by the adhesive manufacturers); carefully roll the felt into the adhesive, ensure that no air is trapped and that the surface of the felt is smooth - pay special attention to securing the edges of the felt. Roll out about 1 metre at a time so that you have a limited area to concentrate upon. When the first half of the sheet has been completed, roll back the other half of the run to the centre of the roof and repeat. Do not use any nails.
Continue this process with successive strips. For the second and successive strips, overlap them by about 50mm (2 inch) over the strip previously laid, apply adhesive over the top of the strip already laid to secure this overlap.
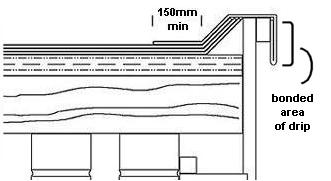
Make the gutter drips (Welted drip)
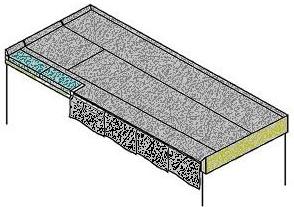 The
gutter drips are formed to finish on the top of the first bonded layer of felt with the inner edge at least 175mm (7 inch) from
the edge.
The
gutter drips are formed to finish on the top of the first bonded layer of felt with the inner edge at least 175mm (7 inch) from
the edge.
To form the welted drip (see edge detail below) cut suitable lengths (check - but usually about 350mm (14 inch)) of Top Sheet, nail each length to the timber batten along the edge of the roof with the felt underside facing out and with the sheet hanging down - ensure that the 'clean' area along the edge of the top sheet line up with the edge of the adjacent sheet. Dress the sheet down to below the timber batten, overhanging the gutter and form a fold back up to the roof line and then fold the remainder back onto the roof. Bond the drip (the fold from the nails down and back up) together and return the sheet to the roof deck bonding a 175mm length on top of the underlay. The Top Sheet will overlap the underlayer finishing about 25mm from the edge.
 This
detail must be formed before the Top Sheet is applied. Ensure that the fascia board is attached level to the roof deck before fixing
a wooden batten of suitable size (50 x 25mm minimum) flush to the fascia board.
This
detail must be formed before the Top Sheet is applied. Ensure that the fascia board is attached level to the roof deck before fixing
a wooden batten of suitable size (50 x 25mm minimum) flush to the fascia board.
Laying the top sheet of felt.
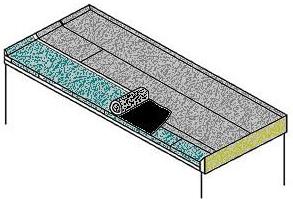 Apply
the Top sheet using the same method of bonding with adhesive as used for the second underlay layer. Lay the first strip at the
bottom of the roof fall with the selvedge (the edge of the Top Sheet which is mineral free) away from the roof edge - the second
strip will overlap onto this.
Apply
the Top sheet using the same method of bonding with adhesive as used for the second underlay layer. Lay the first strip at the
bottom of the roof fall with the selvedge (the edge of the Top Sheet which is mineral free) away from the roof edge - the second
strip will overlap onto this.
Brush away any loose mineral chippings from the top of the gutter drips. Apply the top sheet over the gutter drip pieces so that the top sheet finished about 25mm (1 inch) from the edge of the roof.
Remember to apply adhesive to the selvedge to bond the overlap of the second and successive strips.
Repeat until the roof area is covered, you may need to trim the final length of felt.
Install any verge edge and edging to a vertical wall and flashing Install the finishing to all remaining edges as necessary.
Edge detail 2 - Welted drip to verge.
 Verges
are designed to stop rain driving over the edge, and are formed after the Top Sheet has been applied. The fascia board upstands
the roof deck by 50mm, incorporating a 50 x 50mm triangular fillet, between the junction of the deck and the fascia board.
Verges
are designed to stop rain driving over the edge, and are formed after the Top Sheet has been applied. The fascia board upstands
the roof deck by 50mm, incorporating a 50 x 50mm triangular fillet, between the junction of the deck and the fascia board.
To form the welted drip (see edge detail above/right) cut suitable lengths (check - but usually about 200mm (8 inch)) of Top Sheet, nail each length to the timber batten along the edge of the roof with the felt underside facing out and with the sheet hanging down away from the roof - ensure that the 'clean' area along the edge of the top sheet line up with the edge of the adjacent sheet. Dress the sheet down to below the timber batten and form a fold back up to the top of the fascia and then fold the remainder back onto the roof and down over the fillet. Bond the drip (the fold from the nails down and back up) together and return the sheet to the roof deck bonding at least 150mm on top of the Top Sheet.
Edge detail 3 - Vertical edge.
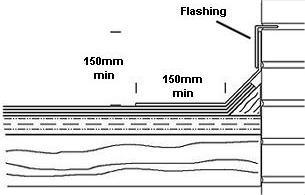 Formed
where a roof buts up to a higher wall.
Formed
where a roof buts up to a higher wall.
As this is not a free surface, there is no need for a fascia board, the provision of a 50 x 50mm triangular fillet at the junction of the upstand and the roof deck is required to smooth the transition. The third layer of felt finishes at the top of the triangular fillet. An additional length of Top Sheet is then used to form an overlapping detail.
These pieces of Top sheet must be long enough to form a bonded 150mm (6 inch) upstand from roof deck and overlap the main area by 150mm. Apply adhesive to both the upstand and the felt before laying.
The upstand is finished by the application of suitable flashing. Clear out 25mm of mortar before you start laying any felt, after the upstand sheet has been laid feed in the edge of the flashing and repoint. Ensure that there is a good overlap between the flashing and the felt upstand.
The finishing touches
Additional sealing
Looking at the edges of a finished felt roof, may shows apparent gaps in the seams especially where the top layer is applied over a mineral layer - mainly where the edging has been installed. If you have followed the instructions for the adhesive and these guide notes, the seam should stand up to the weather, however, if you need 'that little bit more confidence' in your work, it does not do any harm to go around all the seams applying a little extra adhesive externally.
Solar paint
Silver Solar paint can be applied once the roof has been completed, this reflects most of the solar energy so the felt does not get so hot (so it should have a longer life). Follow the instructions supplied by the manufacturers of the paint. Only paint the roof area, do not paint the drips overhanging the edge.
Useful tips
- Do not lay felt in wet or very cold conditions.
- Unroll the felt at least 30 minutes before you to use it.
- Do not try to economise by using the wrong nails to secure the first layer - only use extra large headed clout nail ensuring that they do not protrude below the deck.
- When joining lengths of felt allow a 100/150mm (4 to 6 inch) overlap.
- A broom is useful to press down the felt and smooth out air bubbles.
- Ensure that the joins in any layer do not coincide with the joins in the previous layer.
- On upstands, apply adhesive to both the felt and surface of the upstand.
- Do not cut the felt straight onto the roof or already laid felt, always using a cutting board.
Skill level
Attention to detail and an ability to measure are essential. Laying a felt roof is hard manual work which once started needs to be finished, you cannot leave it halfway through to come back to in a couple of weeks. The best time to lay a felt roof using cold applied adhesive is when the weather is warm, but this means that working on a flat roof can be exhausting work with the sun's heat and the heat reflected from the felt already laid.
The rolls of felt are quite heavy and, to avoid damage, must be handled with care. Generally two people will be required to move the rolls of felt up onto the roof. The number of people required to lay the roof will depend upon the size of it; more hands may make light work but only if the people do not get in the way of each other and if each can be doing different things at the same time.
Safety
Strong gloves will protect your hands when handling the rolls of felt.
Take care with the cold applied roofing felt adhesive - always follow the manufacturer's advice on safety and application.
Wear the appropriate clothing - old clothes are highly recommended as you will not be able to do the job without getting some adhesive on them and it might be easier to throw the clothes away after the job rather than trying to clean them.
Materials
- Underlay felt
- Top Felt, (NEVER store rolls of felt laying down, they must always be stored standing-up, for rolls of Top Felt with the 'clean' overlap edge at the top)
- large head clout nails (see tips)
- cold applied roofing felt adhesive
- Solar paint (if required)
Tools and equipment
- hammer
- tape measure
- strong cutting knife
- cutting board
- straight edge
- broom
- brush (to spread the adhesive)