
Finding the number of self adhesive flooring tiles you need
- Don't (no matter what any books or other web site says), just convert the floor area of the room into so many packs of tile - you need to actually calculate the number - you'll find the reason further down this page.
- There are a number of thing to remember:
- The tiles at the edges should not be less than half a tile wide.

- Keep the calculation you do working out the number of tiles along and across the room, you'll need them when you come to lay the tiles.
- The tiles at the edges should not be less than half a tile wide.
- For a square room the calculation of the number of tiles is straight forward (examples are in brackets for a room 4 metres x 3.5 metres using 300 x 300 mm tiles).
- Measure the longest wall, skirting to skirting at three points along the wall - each end and in the middle - take the largest dimension. Divide this distance by the size of tile. (4m / 300 mm = 13.4 (always round up to one decimal place)).
- Reduce the whole number (13) by 1, this gives the number of full tiles along the room. (12).
- The remaining tile and part is then divided by two to give the two opposite edge tiles (1.4/2 = 2 x 0.7 tiles)
- Now measure the width of the room, again skirting to skirting at three points and take the largest dimension. Now repeat the above for this distance. (3.5 m/ 300 mm = 11.7 gives 10 full tiles plus 2 x 0.9 tiles).
- So just multiple the number of full tiles along the room (12), by the number of tiles across the room (10) to give the number of full tiles (120).
- Along the length of the room there are two rows (each of 12 tiles) of part tiles (the 0.9's which makes 20 tiles).
- Across the width of the room there are two rows (each of 10 tiles) of part tiles (the 0.7's which makes 14 tiles).
- Consider the door way, you may want to take the tiles beyond the skirting to, or under the door. Using a larger part of the part tile along the edge may give you enough additional surface (using a full tile in place of a 0.7 tile will give a further 90 mm (3.5 inch) so may be enough - so in this example, we won't add any additional tiles for the door way).
- And finally there are the 4 corner tiles (each 0.9 by 0.7 tiles).
- Add them all up and you have the number of tiles required (120 + 20 + 14 + 4 = 158).
- If you are buying in packs, just divide the number of tiles required by the pack size (say 6 per pack) and round up (158/6 = 26.3 - so 27 packs required).
- (Maths lesson over, take a break !!). One final point, a 6 pack of 300 x 300 mm is marked as '0.54 square metres', so for a 4 x 3.5 metre room this indicates that only 26 packs are needed - so where's the missing pack ?? Simple, in the waste which you are bound to get. So it pays to calculate the number of tiles you need and buy accordingly, you won't find yourself at midnight with an incomplete floor or the DIY shop out of stock of the style or batch number you want.
- For a room with any sort of feature (a chimney breast or bay), the calculations are more involved and it will be worth starting by drawing a plan of the room and measuring all the sizes. With such rooms you may find that you break the 'no edge tile less than half a tile rule', unfortunately this is unavoidable (or at least, fairly complicated) with some rooms.
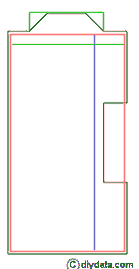 Look at the plan of the room you've drawn and identify the 'main rectangle', in the plan to the right, we take the main body of the room (shown in red) as the 'main rectangle'. The consider the bay as an addition, and the chimney breast as a minus.
 - Start by calculating the number of tiles required for the 'main rectangle' of the room.
- Now consider the chimney breast, and calculate the number of tiles that can be removed from the requirement. The easiest way is to work out an edge of tile row parallel to the chimney breast (if the chimney breast is 400 mm deep, with a 0.9 edge tile, this gives 570 mm from the back of the breast (the edge tile plus one full tile)).
- Now measure the side alcoves (assuming they are both equal - say 1.3m) and work out the tiles required (0.7 edge tile (previously calculated) plus 3.7 tiles). The previously calculation gave 0.7 plus 12 plus 0.7 - from the calculation here, the requirement lengthwise is twice 0.7 plus 3 plus 0.7 or a reduction of 4 tiles. The depth of the chimney breast only fully removed the need for the 0.9 edge tiles, so it's 4 of those tiles that are now not needed.
- Now consider the bay and calculate the number of additional tiles required. Take the inside side of the edge tiles parallel to the front of the bay and calculate the additional tiles into the front of the bay - to keep things simple, treat the bay as a square bay.
Floor preparation - Planning - Setting out - Laying the vinyl tiles - After care